This tutorial will show you how to create a very simple but pretty pricing table using CSS. I promise you this is not complicated at all and doesn’t require much time – very quick and easy.
First things first, we need to determine what it is we want to design. As you can see in the image above, this is a very small table consisting of three columns and roughly three rows. Like I said, simple. The reason I’ve chosen to create a small table like this is that it will cover the basics very well and you should be able to add more on to it whether it’s more options – columns – or more data – rows.
Creating the HTML structure
This table will be based on an unordered list not a variety of divs. This way, the code will be kept clean and it will be much easier to manipulate the table’s elements because it’s much easier to add another list item than to keep track of divs.
Below you’ll see that we are just starting out with a simple unordered list with three items – the three different types of plans. Please note that one of these has a class called extended. That is going to be the way we distinguish the middle price option making people notice it more than others because it is the one we want them to focus on and buy more.
[html]<ul class="pricing_table">
<li class="price_block"></li>
<li class="extended price_block"></li>
<li class="price_block"></li>
</ul>
[/html]
Now, let’s add in the different types of information that a plan should provide, including price, price internal (i.e. per month), four different features of the plan and a sign up button. As you can see there is not a lot going on. None of these have added classes yet, those will come next; I need you to take a look at the structure first though and understand what is going on.
[html]<li class="price_block">
<h3>Basic</h3>
<div>
<div>
<span>$5.99</span>
<span>per month</span>
</div>
</div>
<ul class="features">
<li>1 user</li>
<li>10 clients</li>
<li>15 Projects</li>
<li>5GB of space</li>
</ul>
<div class="footer">
<a href="#"> Sign up</a>
</div>
</li>
[/html]
Now let’s add the missing classes to these elements and replicate these for the remaining two blocks. Don’t forget to change out the information a bit as it is a pricing table and you need to provide your potential customers with a few different choices!
[html]<li class="price_block">
<h3>Basic</h3>
<div class="price">
<div class="price_figure">
<span class="price_number">$5.99</span>
<spann class="price_tenure">per month
</spann></div>
</div>
<ul class="features">
<li>1 user</li>
<li>10 clients</li>
<li>15 Projects</li>
<li>5GB of space</li>
</ul>
<div class="footer">
<a href="#" class="action_button"> Sign up</a>
</div>
</li>
<li class="extended price_block">
<h3>Extended</h3>
<div class="price">
<div class="price_figure">
<span class="price_number">$29.99</span>
<spann class="price_tenure">per month
</spann></div>
</div>
<ul class="features">
<li>5 user</li>
<li>50 clients</li>
<li>100 Projects</li>
<li>15GB of space</li>
</ul>
<div class="footer">
<a href="#" class="action_button"> Sign up</a>
</div>
</li>
<li class="price_block">
<h3>Premium</h3>
<div class="price">
<div class="price_figure">
<span class="price_number">$9.99</span>
<spann class="price_tenure">per month
</spann></div>
</div>
<ul class="features">
<li>Unlimited user</li>
<li>Unlimited clients</li>
<li>Unlimited Projects</li>
<li>Unlimited space</li>
</ul>
<div class="footer">
<a href="#" class="action_button"> Sign up</a>
</div>
</li>
[/html]
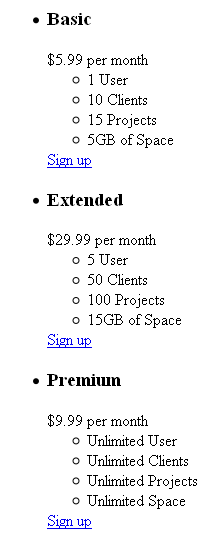
If you take a look at the following image, given that the CSS hasn’t been added yet you should expect something like this.
Adding the CSS dazzle
Given that this is just a tutorial you should include the CSS in the <head> of your document. There is no need to flip between files just for this – but it is a must practice for actual projects. Moving on, we are first going to reset the padding and margins on every element because we want this pricing table to look as uniform as possible across all browsers and we also don’t want to deal with weird settings that browsers may enforce upon us. Then, we want to define the default text color and font as well as a nice background color to make the table stand out.
[css]* {
margin: 0;
padding: 0;
}
body {
font-family: Verdana, Geneva, sans-serif;
background: #7acdc8;
color: #555;
}
[/css]
Okay, so the next set is going to be to define each area’s look in bulk. We’ll start with the overall price table and the individual pricing blocks. As you can see we are placing the whole table in the center of the page thanks to the margin: 0 auto property, we are also setting a default font size for the whole table. Also, an important property to take note of the box-sizing: border-box one. What it does, in a nutshell, is instead of adding the padding, or border to the already set height it includes it in the height by changing the content area. You can read about it more here: CSS Box-sizing for Noobies.
[css].pricing_table {
margin: 0 auto;
width: 600px;
line-height: 150%;
font-size: 12px;
padding-top: 10px;
}
.price_block {
text-align: center;
float: left;
width: 200px;
list-style-type: none;
transition: all 0.25s;
position: relative;
box-sizing: border-box;
}
[/css]
As you can clearly see the next step is to hit the elements down the list within the price block itself. Below we’ll be setting the style for the pricing table’s title and the price display as well.
[css].pricing_table h3 {
text-transform: uppercase;
padding: 5px 0;
background: #d7d7d7;
}
.price {
display: table;
background: #e1e1e1;
width: 100%;
height: 70px;
}
.price_figure {
font-size: 24px;
text-transform: uppercase;
vertical-align: middle;
display: table-cell;
}
.price_number {
font-weight: bold;
display: block;
}
.price_tenure {
font-size: 11px;
}
[/css]
This is a very quick style change that is going to affect the different features or perks a plan has to offer. There is not much to it as you can see for yourself. If only everything else was that easy…
[css].features {
background: #fff;
}
.features li {
padding: 8px 15px;
font-size: 11px;
list-style-type: none;
}
[/css]
Now, the footer is the very bottom section of the price block where you see the button. I am continuing the same background color for it; I want the button to stand out not the whole section. But, I am adding some padding. The button itself is getting a bit more done to it as I need it to be perfect. Additionally, take note of the changes for the hover state – it is important that flat buttons have a hover effect that distinguishes them and identifies them as a button – unfortunately it is not always noticeable that a button is a button in flat design.
[css].footer {
padding: 15px;
background: #fff;
}
.action_button {
text-decoration: none;
color: #262626;
font-weight: bold;
border-radius: 5px;
background: #e1e1e1;
padding: 10px 35px;
font-size: 11px;
text-transform: uppercase;
}
.action_button:hover {
background: #d7d7d7;
}
[/css]
Below is an image of what the previously made changes were accomplishing. I hope you got the same thing, if not look over your code or take a look at the attached demo files.
Distinguishing the extended plan
I’ve pointed out before that the middle price block was supposed to have a class of ‘extended’. This is why – we need to set it apart from the other blocks! This can be done very easily by simple changing the colors of certain elements for that particular price block. So, let’s do just that. In the code below we are changing the background color of every element and the text color of some of them to add an extra touch of distinction.
[css].extended h3 {
background: #ff7d32;
color: #fff;
}
.extended .price {
background: #ffc800;
color: #fff;
}
.extended .features, .extended .footer {
background: #f4f3f0;
}
.extended .action_button {
background: #ffc800;
color: #ff7d32;
border: none;
}
.extended .action_button:hover {
background: #ff7d32;
color: #ffc800;
}
[/css]
All done
And, you are all done. I hope this wasn’t complicated as it was not meant to be by any means. The most important part to take away from this tutorial is how to create the structure of the pricing table and how to align these elements so that they, in fact, form a pricing block. I hope you enjoyed this small tutorial and that you are confident in taking your next pricing table to the next level!
