A Step-by-Step Guide to Creating Effective User Journey Maps
In a world where you can reach your customers in so many different ways, how can you ensure consistently high levels of user experience across all of those channels?
That’s a really daunting task. It requires a smooth and effective communication between multiple departments and a clear strategy. Fortunately, we have UX to bridge the gap between the needs of both product development and marketing teams, while also designing a delightful experience for the end users.
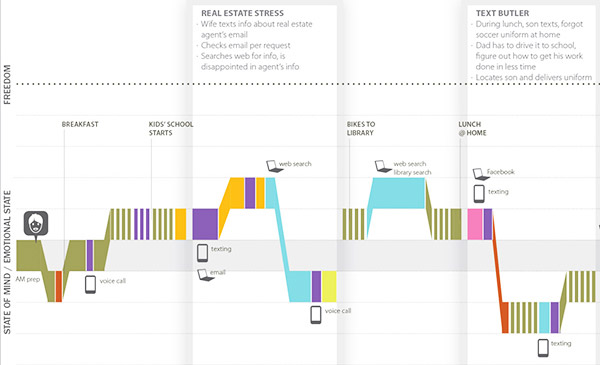
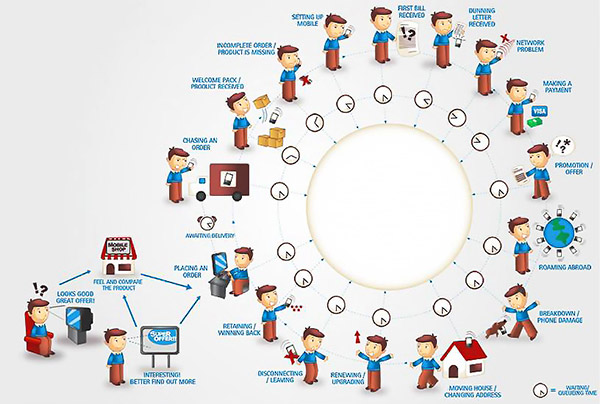
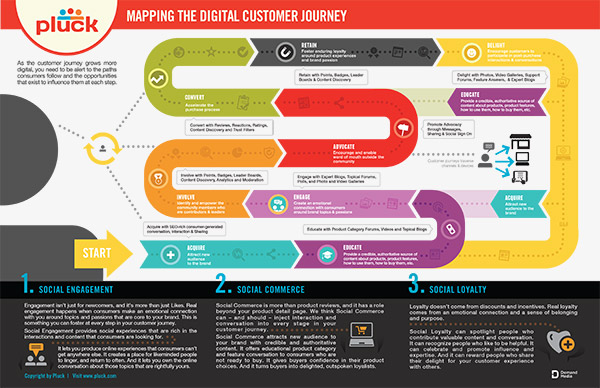
User journey mapping is one of the tools that UX pros use to find and address the weakest points in customer experience with the product. It helps visually articulate the key touchpoints where users interact with your product and analyze the user experience at each stage. The map itself looks different for each project, that’s why some professionals prefer to refer to it as “journey modeling”. Depending on its goal a user journey may have various sections, but generally it highlights typical user behavior step by step for each channel (website, physical store, call center, mobile app, etc) or simply highlights user’s actions, thoughts and ideas at each step.
What Are the Benefits of a User Journey Map?
- Creating user journeys requires plenty of research and teamwork, which is usually quite time consuming and sometimes even painful. But is it really worth it? Let’s see.
- User journey maps help analyze user behavior through various channels and for each persona type.
- It showcases the thoughts, feelings and emotions that users experience at every interaction stage and reveals the most painful touchpoints, where the product may be losing significant business.
- User journey map is an easy and comprehensible document that can be used to clearly explain the strengths and weaknesses of the product in terms of user experience.
- User journey mapping is done through creative brainstorming sessions and workshops that involve different departments thus preparing ground for new ideas and innovative solutions.
User journey modeling goes along with persona development and can be done basically at any stage of product development when you feel unsure about the UX or need some extra insights into user behavior flow.
How to Create a Journey Map?
User journey mapping is not a thing you do for show or just to keep your team busy. No. There should be a goal behind it and a clear understanding of the problem. So first of all you need to identify what exactly you want to find out (e.g. what’s the reason for such a low conversion rate?) and how you are going to use the insights collected with the help of journey mapping (e.g. what can be done to meet and exceed user expectations?) . This is an essential step in user modeling, because when you dive into all the research data it’s easy to get carried away and lose the vision of the main goal.
Once you have it all set up, here are the main steps in user journey mapping that you need to go through.
Step 1. Defining the Lens
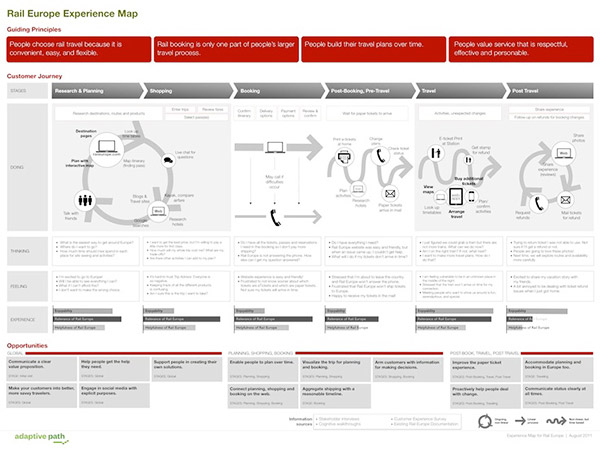
According to Chris Risdon from Adaptive Path, “The lens is an overriding filter through which you view the journey”. The lens indicates some key findings or principles that you should keep in mind while working on the journey map. If you have 2 or 3 clearly distinct user personas and you are interested in a particular user behavior flow, the lens will include some of the main characteristics of specific user personas. For example, you can highlight the context in which customers use your product, the educational or work background of the user persona, etc. In this case you also will need to create different journey maps for each persona type or synthesize them in some way. Alternatively, the lens may include some general guidelines or criteria that you may want to look at throughout the whole process.
Step 2. Gathering Data
The effectiveness and importance of a user journey map heavily depends on the quality of insights it provides. So it should be backed up with solid research and a variety of information sources. As a starting point you can make use of existing user data, including call center logs, customer satisfaction surveys, existing personas, website analytics data and pretty much anything that relates to your target users. Although most of this information will be filtered and just a fraction of it will end up on your journey map, but at this point your main focus should be getting to know the user better at every stage of interaction.
Surely, there will be information gaps, things that you don’t know about the user and here’s where you need to do some extra research, including both quantitative and qualitative. Quantitative data helps understand certain phenomena better (e.g. 36% of users fail to fill in CAPTCHA correctly at the first attempt) and it can also reinforce some qualitative analysis findings that may otherwise seem unlikely or strange.
On the other hand, numerical data cannot communicate the feelings and emotions that users experience when interacting with the product, while those are paramount in customer decision making. As Joel Flom from UXMatters suggests “Journey maps succeed when they’re based on ethnographic research and contextual inquiries that allow researchers to experience a day in the life of a customer.” This can be done through face-to-face user interviews and testing, where you can get a sense of a customer’s impression of the experience.

Step 3. Drafting the Map
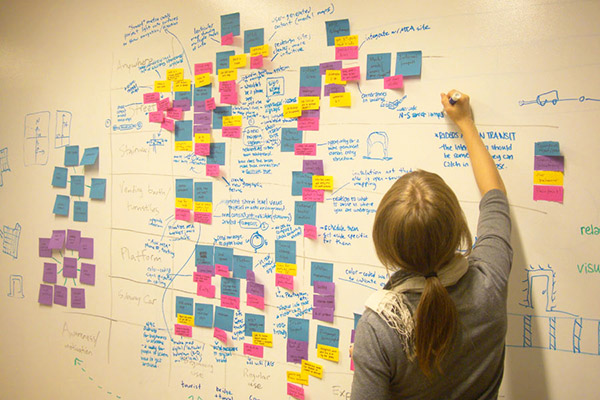
Although experience mapping requires a lot of research, it’s not enough to create an effective and useful document. It is important to get different employees (stakeholders, guest relationship managers, UX pros, designers and developers) involved in the process to foster constructive debates and discussions and as a result, new ideas to address the needs and wants of the users. Organize a collaborative workshop, catch everyone up on the goals and context of the experience mapping and guide them through the process of creating the first draft. As a result of this brainstorming session you will have a preliminary (physical) version of the user journey map built up from a bunch of sticky notes and butchers paper.
Step 4. Create the Story
Once you have the rough draft of the user journey, you need to summarize all of the key findings into a concise, yet comprehensible visual story. You may find this to be the most difficult step in the whole process, but don’t be discouraged. Experiment with different data visualization techniques and layout templates or take your time to design something new and perfectly suitable for your particular data type.
Just make sure it delivers valuable insights, grounded in research in an easy-to-use format.
Step 5. Make Use of It
No matter how much research you have done or what layout you have chosen, it all won’t be worth a thing if the journey map you create ends up in CEO’s “I’ll have a look at it someday sometime” drawer. Though the map should be able to stand on its own, it’s important to communicate the findings both to the executives/decision makers and to the staff in general in order to create empathy for the users and their needs. The journey map should highlight the key pain points and hint on the solutions that will dramatically impact the user experience in a positive way.